Настройка параметров билета
Jul 16, 2026Updated3 min read00
When creating an event, on Step 6 you can do more than just specify the ticket name, price, and quantity. Each Ticket Option also includes additional settings. Below, we'll explain what each of them is used for.
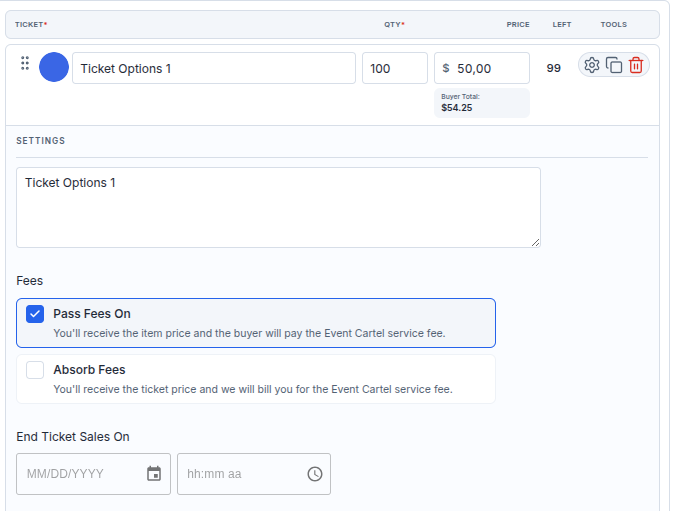
To open the additional settings, click the ⚙️ icon next to the desired Ticket Option.
At the top of each Ticket Option, you'll find the following fields:
Qty – the total number of tickets of this type available for sale. A single Ticket Option can contain up to 500 tickets;
Price – the price of one ticket;
Left – the number of tickets of this type still available for purchase. This value decreases with each completed purchase.
Tools – tools for managing the Ticket Option:
⚙️ – expand or collapse the additional settings;
⧉ – create a copy of the Ticket Option. All settings except the ticket color will be copied to the new Ticket Option;
🗑️ – delete the Ticket Option.
Description:
Enter a description of the ticket in the text field.
We recommend adding information that helps customers understand what is included with the ticket or how it differs from other ticket options.
For example:
• Access to the VIP area;
• One complimentary drink included;
• Ticket for children under 12;
• Access to a specific section.
The description will appear below the ticket name on the checkout page.
Fees:
Choose who will pay the EventCartel service fee:
Pass Fees On – the customer pays the service fee. The organizer receives the full ticket price;
Absorb Fees – the organizer pays the service fee. It will be deducted from the ticket revenue.
Only one option can be selected.
End Ticket Sales On:
Specify the date and time when sales for this Ticket Option should automatically end.
Once the specified date and time is reached, this Ticket Option will no longer be available for purchase, even if some tickets remain unsold.
If you don't want sales to end before the event, leave these fields blank.
Ticket Allowed Per Order:
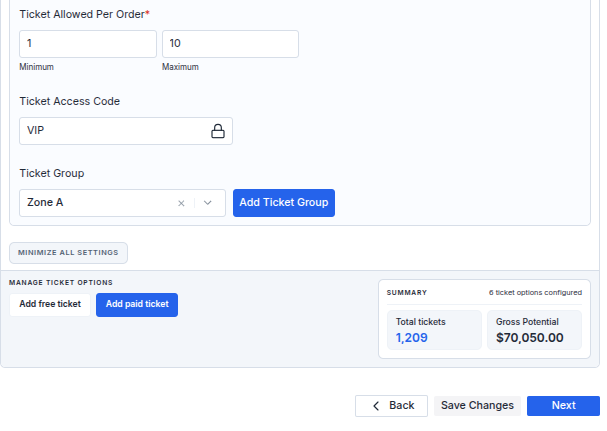
Set the minimum and maximum number of tickets of this type that can be purchased in a single order.
For example, if you set the minimum to 2 and the maximum to 6, customers will be able to purchase between 2 and 6 tickets of this type in one order.
Ticket Access Code:
Add an access code if this Ticket Option should only be available to selected customers.
This can be used for private presales, partners, staff members, VIP guests, or specific customer groups.
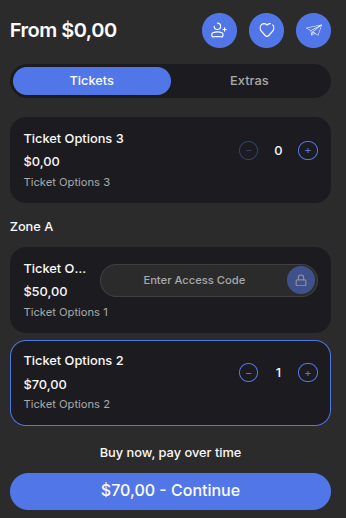
On the checkout page, customers will first see the Enter "Access Code" field instead of the ticket quantity selector. After entering the correct code, the Ticket Option will become available for purchase.
Ticket Group:
Ticket Group allows you to group multiple Ticket Options together.
For example, you can create groups such as:
• Zone A;
• VIP Tickets;
• Balcony.
To group multiple Ticket Options together, enter the same name in the Ticket Group field for each of them.
On the checkout page, Ticket Options with the same group name will be displayed next to each other.
Manage Ticket Options:
At the bottom of the page, you can add new Ticket Options:
Add free ticket – create a free Ticket Option;
Add paid ticket – create a paid Ticket Option.
After adding a Ticket Option, specify its name, quantity, price, and any additional settings you need.
Summary:
The Summary section displays general information about all created Ticket Options.
Ticket options configured – the total number of Ticket Options created;
Total tickets – the total number of tickets across all Ticket Options;
Gross Potential – the maximum potential revenue if all paid tickets are sold at their current prices.
For example, if you create 100 tickets priced at $50 and 500 tickets priced at $70, Total tickets will show 600, while Gross Potential will display the maximum potential revenue from selling all paid tickets.
The actual payout amount may differ due to service fees, discounts, refunds, and other factors.
After configuring all settings, click "Save Changes".
Done! On the checkout page, Ticket Options with the same Ticket Group will be displayed next to each other. Ticket descriptions will appear below the ticket name, and customers must enter the correct access code before protected Ticket Options become available for purchase.